Full virtual library user guide
Frequently asked questions:
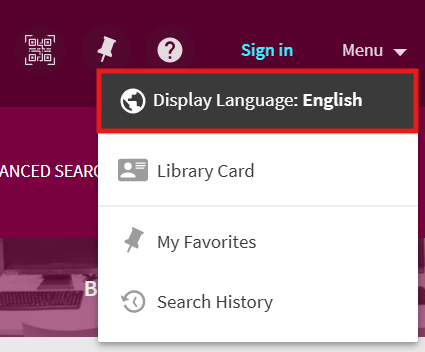
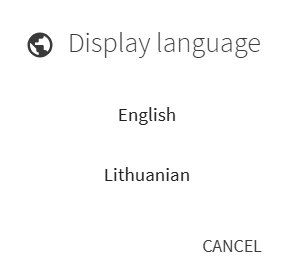
How to change the language of User Interface?
To change the user interface language:
1. Open user's main menu or click on your name displayed.

2. Select „Display Language: English“ from the pop-up menu that opens:
3. Choose the required language from the pop-up menu:
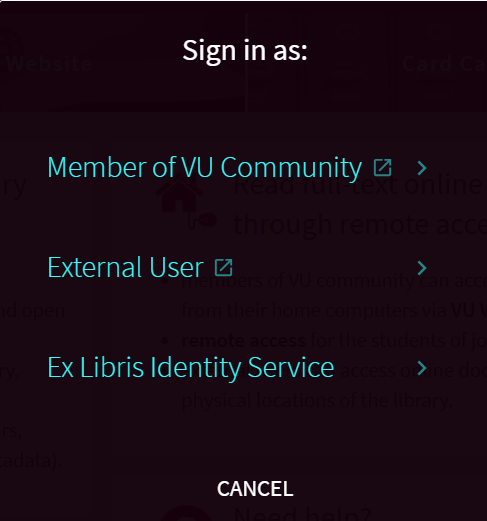
How to Sign In?
To Sign in, click the “Sign in” option at the top of any page.

In the login screen, select the appropriate login method: if you are a VU student or employee, select "VU community member"; if you are an external user and have a personalized user card, select "External user". Enter your user name and password.
If the login fails, we recommend changing the password.
Please note:
-
The system may not recognize the characters you selected if you use Lithuanian letters (ą, č, ę, ė, į, š, ų, ū, ž) in the password.
-
The password must consist of Latin (English) letters, numbers and special characters.
- The password should consist of less than 20 characters.
Members of the VU academic community can change their password by logging in to id.vu.lt. Other readers with library cards should contact the Information Desk staff for a password reset.
How to perform a Basic Search?
You can search very easily in Primo:
- Type one or more search words. To enter an incomplete word, see Using Wildcard Characters in Search section.
- Click the "Search" button (a magnifying glass image on the right from search words).
- If you enter multiple words, Primo will return results that contain all of the specified terms. When searching by entering ISBN and ISSN, values are searched with or without hyphens. If you are not getting expected results with hyphens, please try your search again without hyphens.
Searching for an Exact Phrase
To search for an exact phrase (words next to each other and in exact order) type quotation marks around the phrase. For example, to search for "service management" as one term, type the following in the search box:

You can combine both words and phrases in your search. For example "service management" marketing will perform a combined search:

How to perform a search in the Selected Search Scope?
What is a Search Scope?
The search scope defines where the system should perform the search. The default search scope is called “Library resources” and consists of all local catalogues, subscribed and freely available resources from Vilnius University library. The search scope can be changed by selecting a search scope from the drop-down list in the search box.

How to select a Search Scope?
Tips for selecting a search scope:
- When searching for physical documents – books, newspapers, manuscripts, graphics cabinet works, rare prints, maps - it is recommended to choose the resource "Physical resources". Then there will be fewer results, no e-documents and it will be easier to find the book or other publication you want to order.
- To search only for electronic resources – e-books, articles, magazines, encyclopaedias, manuals, dictionaries – it is recommended to choose the resource “Electronic resources”.
- If you are looking for bibliographic data on publications in the press and on Internet portals dedicated to the history or current activities of Vilnius University and Šiauliai University (up to year 2020) in various languages, it is recommended to choose the resources of “Bibliographic database”.
- If you are looking for publications, final theses, doctoral dissertations and their summaries published by Vilnius University and Šiauliai University (up to year 2020) lecturers, researchers and students – it is recommended to choose the resource “Institutional Repository”.
How to perform an Advanced Search?
The Advanced Search allows you to specify additional lines of criteria, specify filters prior to executing the query, combine queries with logical operators.
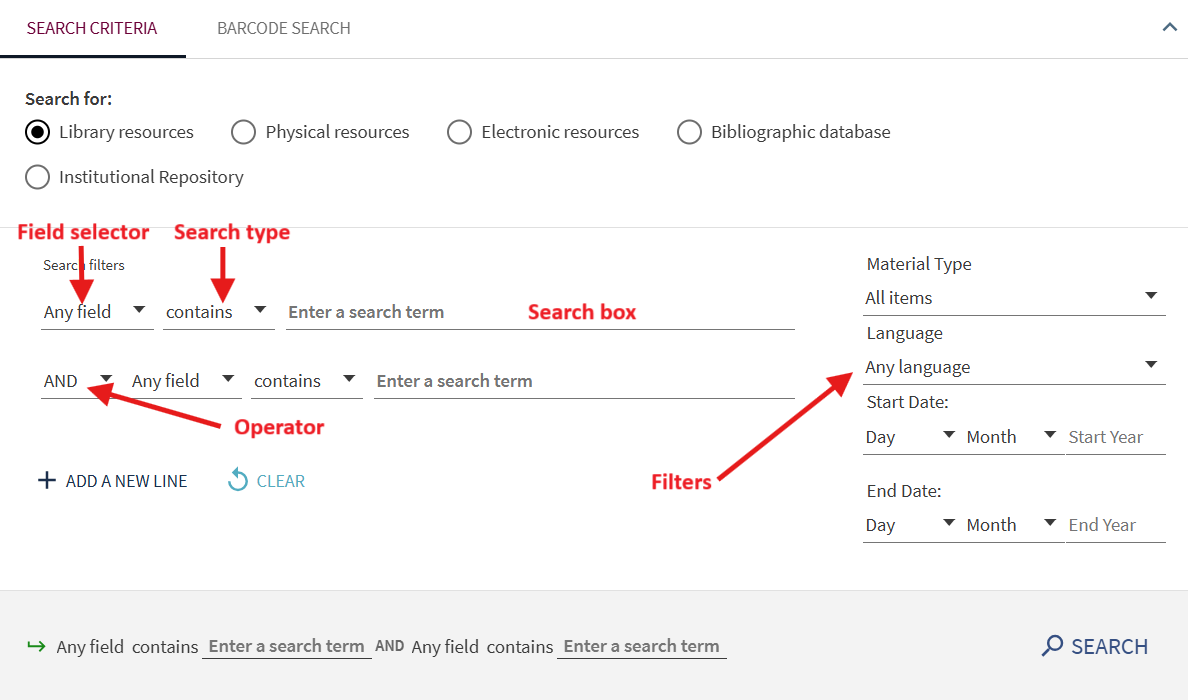
The Advanced Search page contains the following components and options:
- Field selector – For each search line, this parameter allows you to narrow the search to all search fields or a particular field (such as title and subject).
- Search type – For each search line, this parameter indicates whether the phrases in your query are treated as phrases or exact phrases. The following values are valid: is (exact), contains, starts with.
- Operators – As with basic searches, you can include the following logical operators between words and phrases in each search line: AND, OR, and NOT. You can read more about logical operators in the Virtual Library user guide.
Barcode Search
If you are looking for a specific copy of a publication, select Barcode Search in the advanced search. By entering the barcode in the search field and clicking "Search", the system will find the copy of the publication you are looking for.

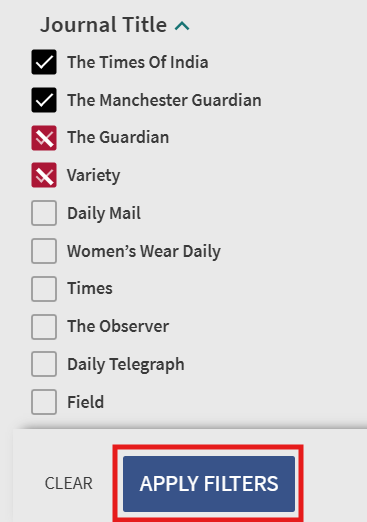
How to filter the Results?
The "Tweak your results" section, which appears on the left side of the Brief Results page, contains a list of categories, which are referred to as facets. Each facet can be selected under both conditions: "YES" (including entries with selected attributes only) and "NO" (excluding entries with selected attributes).
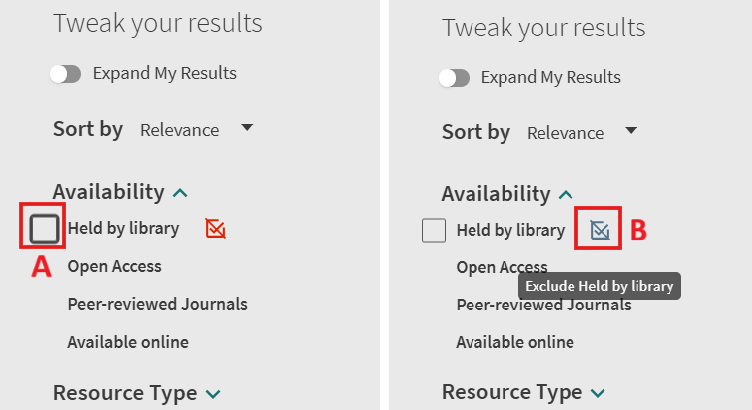
To include / exclude facets:
- Perform a search.
- For each facet that you want to include or exclude – select the check box on the left side of the facet (A) and then select include/exclude type by clicking the button on the right side of the facet (B).
- Click “Apply Filters” button to filter your results. The selected facets will appear in the Active filters section.
Tips for better refining your search results:
- To find out which reading room or building (CB, MKIC, ŠAIC or faculties) contains the book or other document you need, select the "Library" filter.
- With the “Availability” filter, you can filter only documents that are available online or available in the library.
- You can use the "Creation date" filter to set the time period for which documents are relevant to you.
- By applying the "Resource Type" filter, you will be able to filter search results by document types: books, articles, journals, dissertations, etc.
- You can use the "Sort by" feature to see more accurate and up-to-date search results at the top of the page.
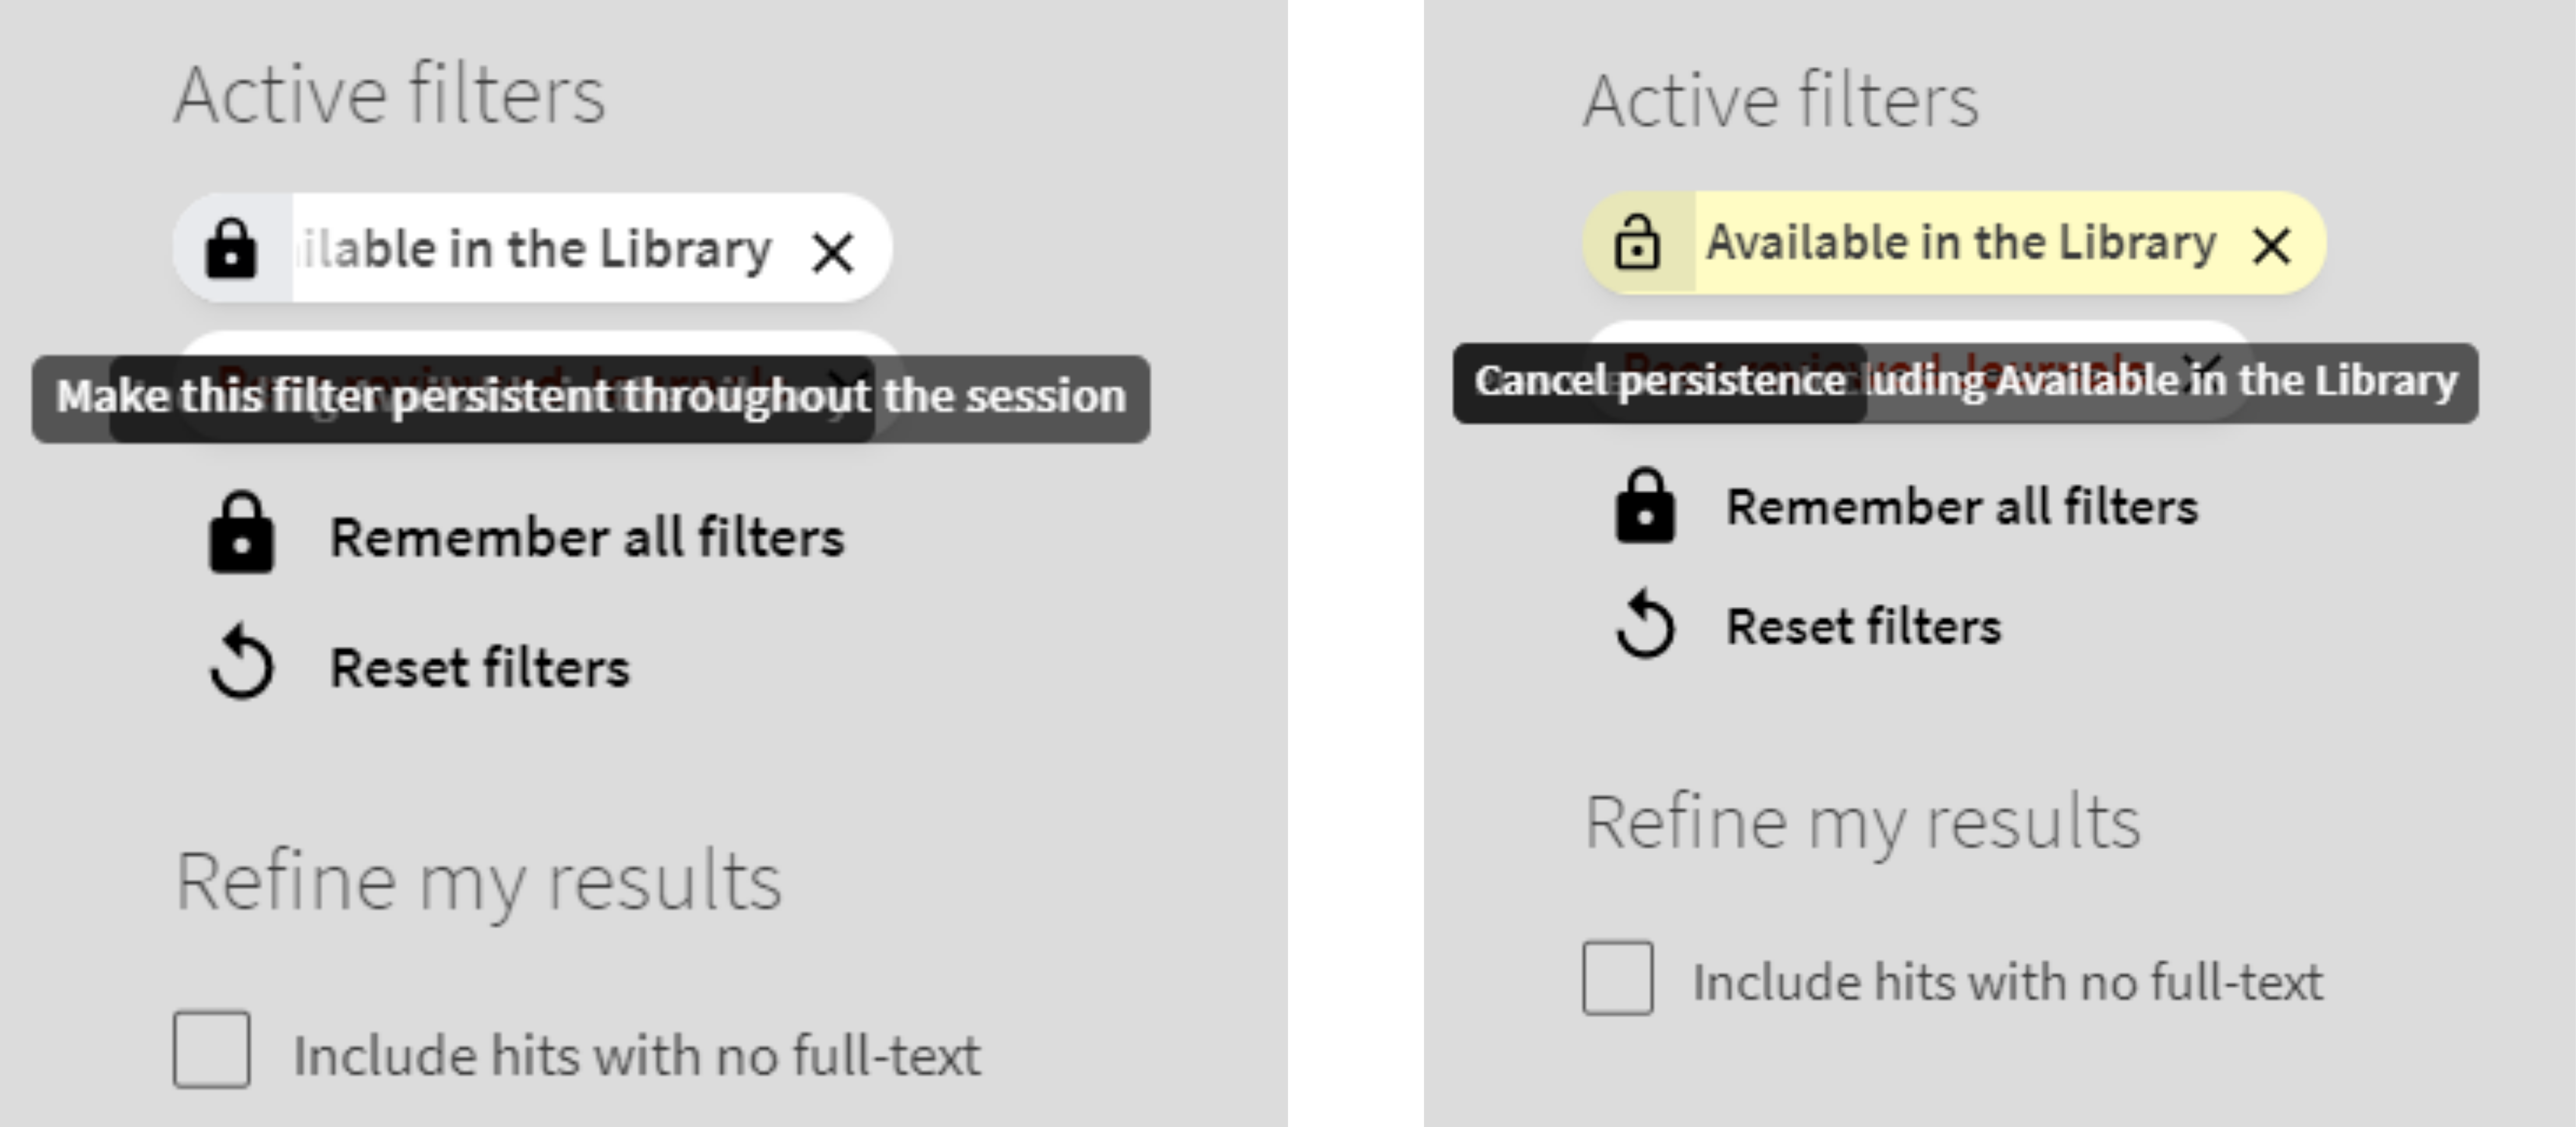
Persistent Facets
When performing many similar types of searches, you may want to retain your filters for subsequent searches within a session.
To make a facet persistent, hover the cursor over the facet in the Active filters section and then click the facet's padlock button "Make this filter persistent". To remove a filter's persistence, click the facet's padlock button "Cancel Persistence" or delete the facet.
What information can be found in the Full Display Page?
After selecting an item in the Brief Results, the record's Full Display opens to display additional information. Users can either scroll to a particular section or use the links shown on the left side of the page.

The item's information is organized by the following sections:
- Send To – This section allows users to perform the following actions on the selected item: email item details, create a citation, export to Excel, send to reference management service (such as RefWorks, Mendeley) and create a permalink.
- View Online – This section appears only if the item is available for online viewing and provides information on which databases the document is available in, as well as links to the full text of thedocument in the specified databases.
- Get It – This section appears only for physical resources. It provides information about the storage locations of the document, loan status and provides the opportunity to request the document, if possible.
- Details – This section displays additional details to help the user decide whether to choose this item.
- Links – This section displays additional links, which may allow you to view cover art, the Table of Contents, and so forth.
- Virtual Browse - This section allows users to browse items based on the location of an item in the search results. The user will be able to navigate through items on the shelf, starting at the selected item’s browse/call number value.
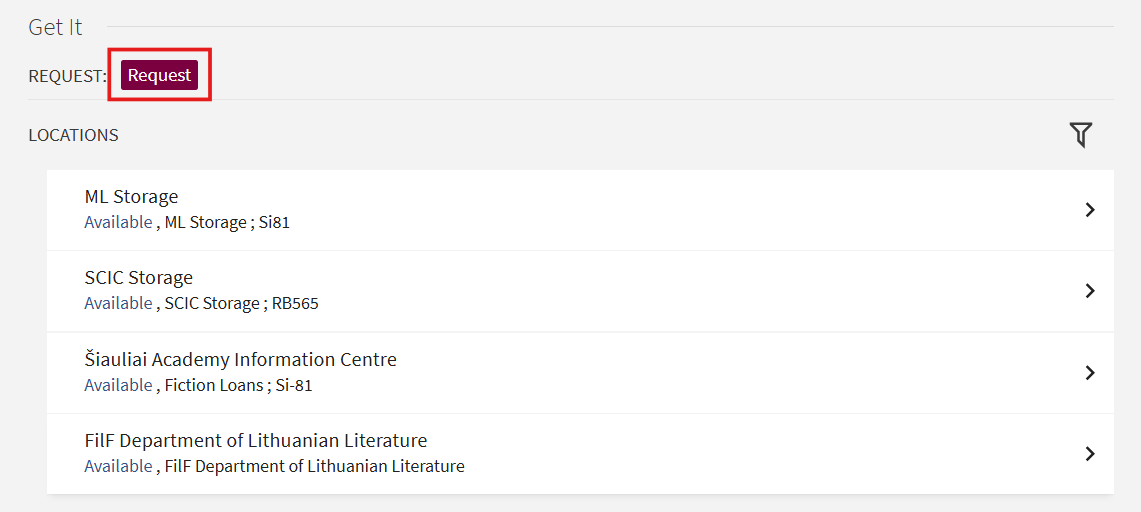
How to place Hold Requests?
Note! Not all publications can be requested via Virtual library. See more information about publication requests here.
To place a hold request:
- Log in to your Virtual Library account.
- Perform a search for a record.
- Open the record's full display page, "Get It > Locations" section.
- Click on the "Request" button.
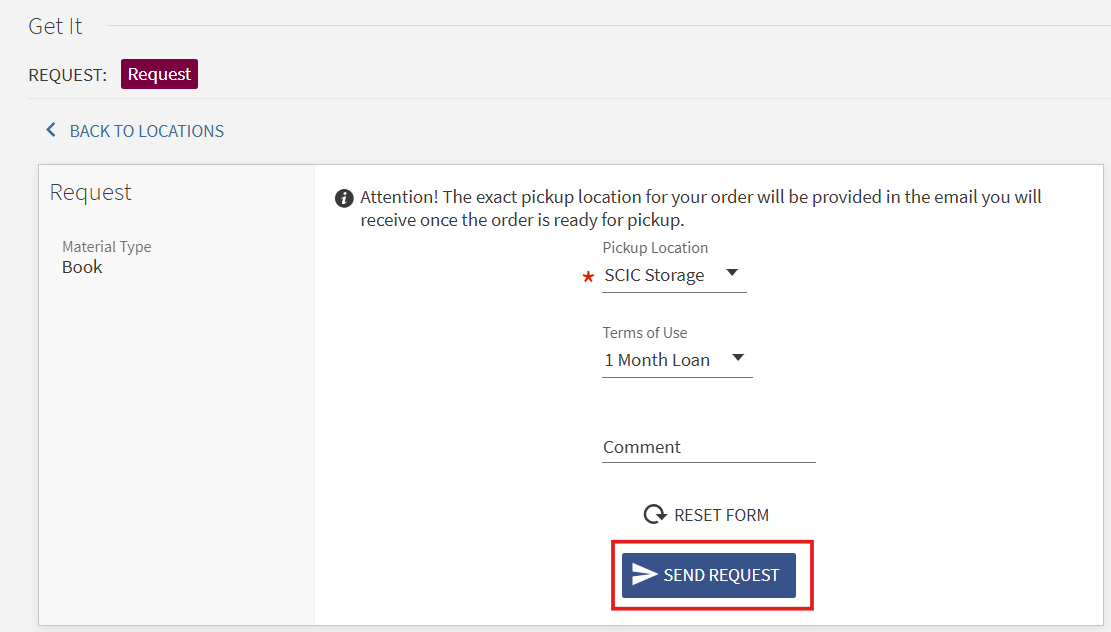
 Fill out the request form: specify the pickup location (only allowed to select if there is more than one pick-up location available); select the terms of use. Short message to a librarian can be added if needed.
- Confirm a hold request by clicking “Send Request” button.
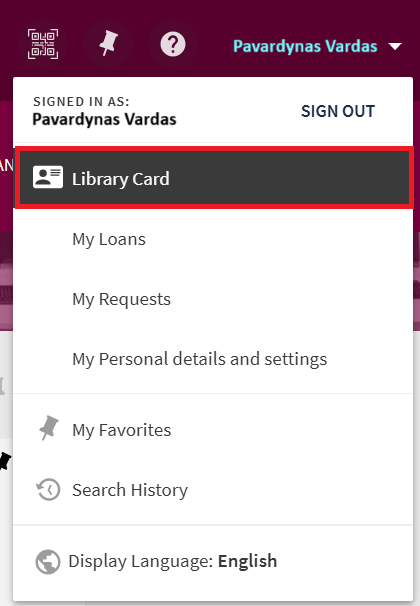
My Library Card
With the “My Library Card” feature, you can:
- Extend the deadlines for loan items
- Read messages the library staff posted you
- Change your personal settings.
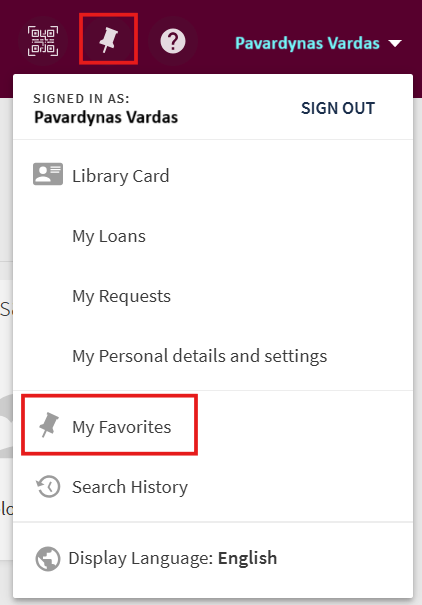
“My Library Card” is accessible by clicking the Sign-In area in the upper right corner of the screen and choosing “Library Card” in the expanded menu.
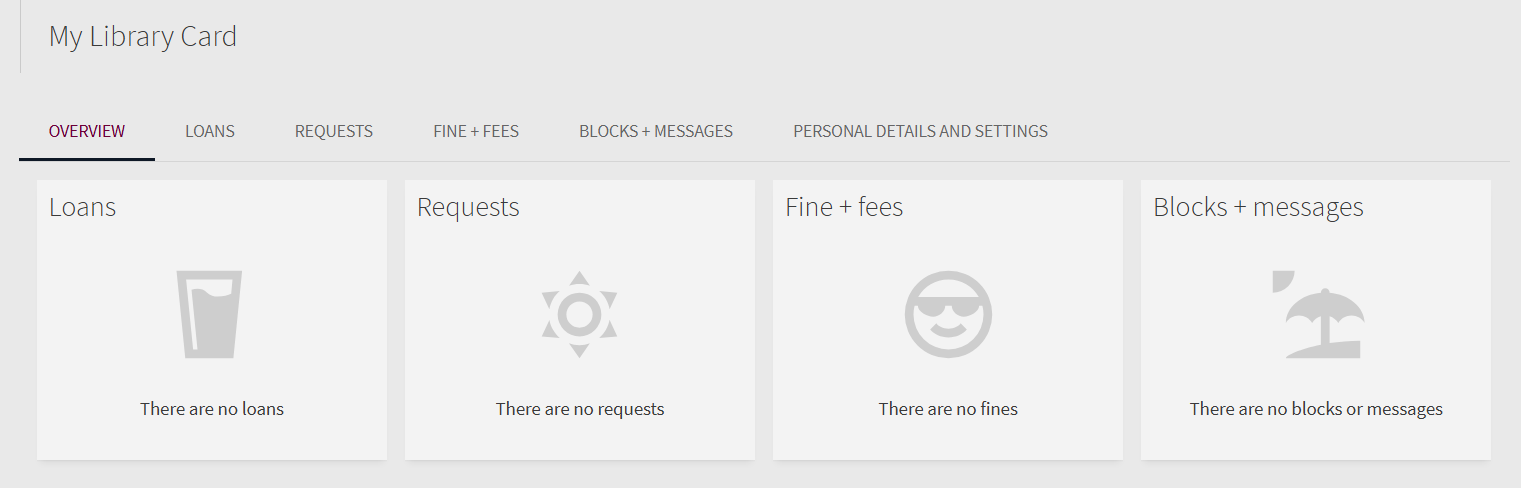
Logged in users in “My Library Card” will find:
- Loans – active and historical loans.
- Requests – on hold requests.
- Fine + fees – penalties and fees for non-returns.
- Blocks + messages – all general messages and any blocks that may prevent you from accessing services in the library.
- Personal details – user data validity, option to change default interface language, etc.
How to save records in My Favorites?
Saved Records – displays all of your saved records and allows you to manage your saved records. Signed-in users are able to save found records for subsequent sessions. After a record has been saved, the “My Favorites > Saved Records” page allows users to perform the following operations on saved records: view, delete, and label.
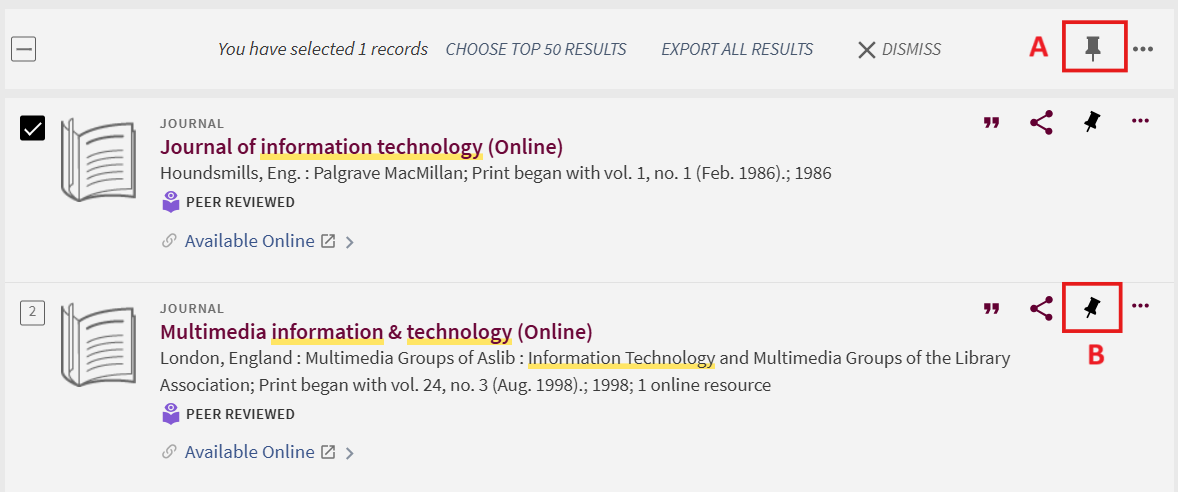
To save a single record:
- Perform a search.
- If you want to save more than one record, select the records and click "Add this item" button at the top (pin A).
- If you want to save a single record, click the “Add this item” button (B) next to the item that you want to save in the search results.
- The item added to the My Favorites will be highlighted and will have different “Remove this item” button.
How to save searches?
Signed-in users are allowed to save searches between sessions and receive email alerts when there is an update to the saved search query.
Saving a Search query:
- Perform a search that you want to save.
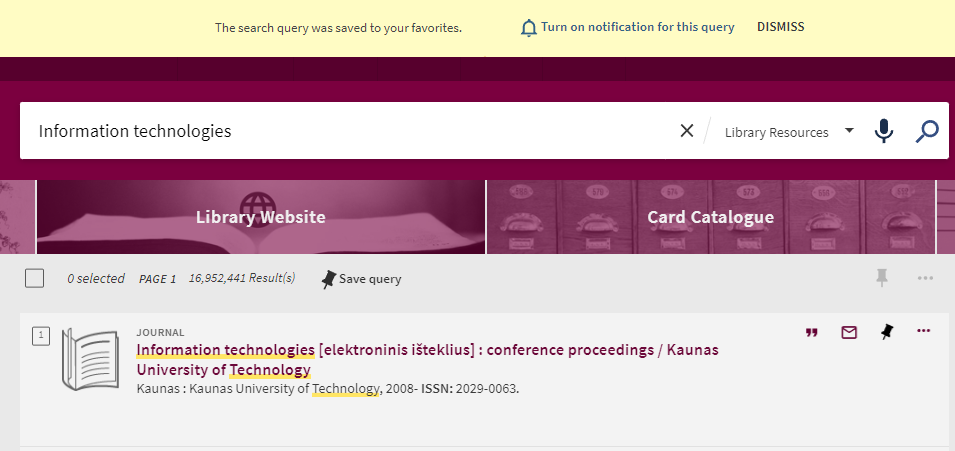
- Click “Save Query” above the search results.
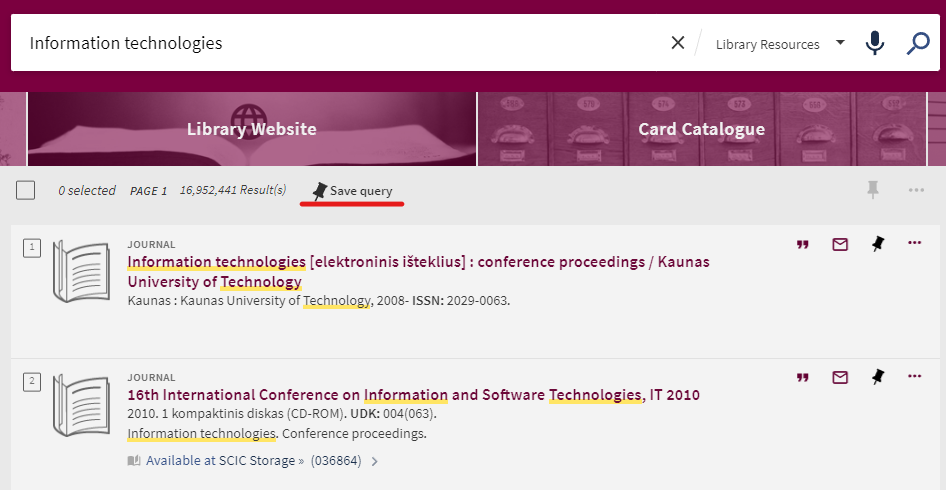
In addition, you will have an opportunity to set an alert for this query by clicking the notification link that appears after saving a query.
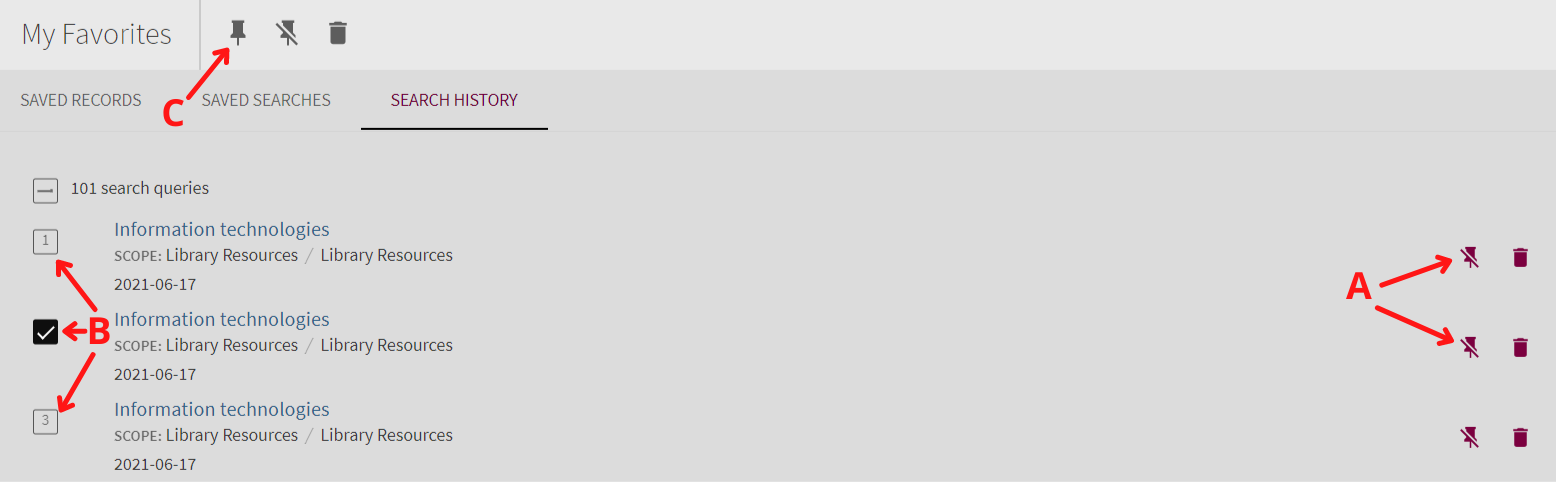
To save a query from the Search History:
- Click the My Favorites button ("Pin") at the top of the page.
- Select the Search History tab to display your current session's search history.
- Click the “Add this item” button that appears next to the desired query.
- Or select all desired queries (use B selectors) and click the “Add this item” button that appears in the main My Favorites menu.
Loans, Renewing Loans
Signed-in users can see their active loans, previous and historic loans and renew active loan. Loan list can be accessed from user space My Library Card section Loans.
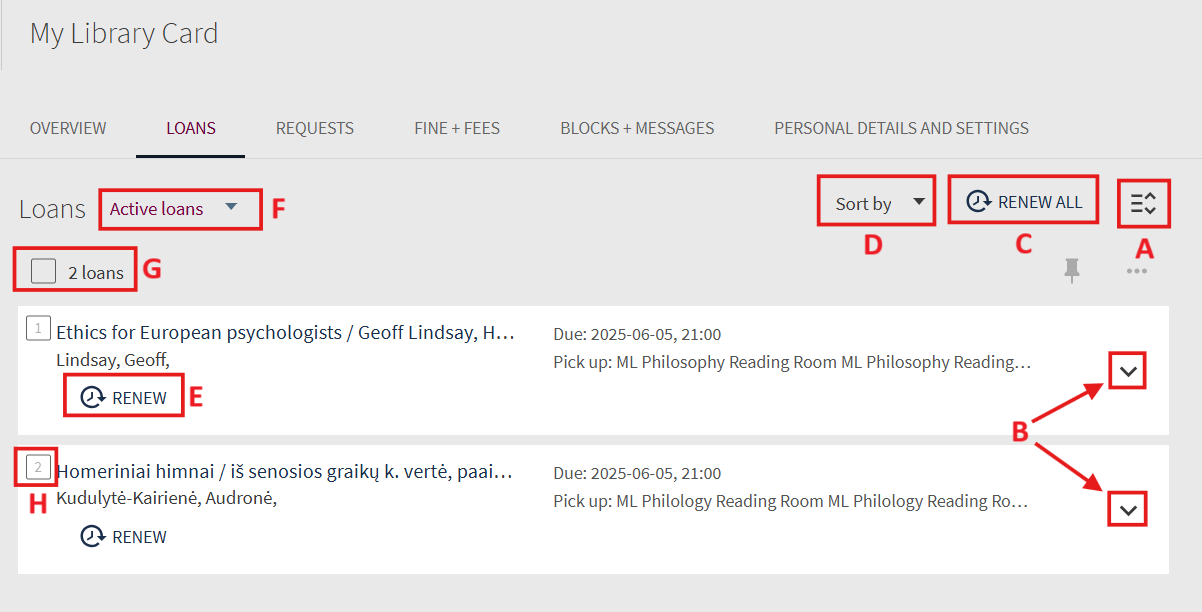
In Loans list user can:
- Click A to show detailed information for the all loans.
- Click B to show detailed information for the selected loan.
- Click C to renew all loans. The individual terms for renewal of each loan will be evaluated. If any loans were selected by function H, the button will change to Renew Selected.
- Click D to choose loans list order method.
- Click Renew (E) to renew the selected loan. Depending on the terms of renewal, the customer is allowed to renew the loan once for a maximum period of 1 month, if the loaned item has not been requested by other users.The items that cannot be renewed on the Loans tab will be marked Not Renewable icon.
- Click F to switch between Active loans and Previous and historic loans.
- Click G field to select all items in the Loans list.
- Click the number field (H) to add loan to the selection list.
Note! Loans with near due time and overdue loans are marked with additional icons and text.
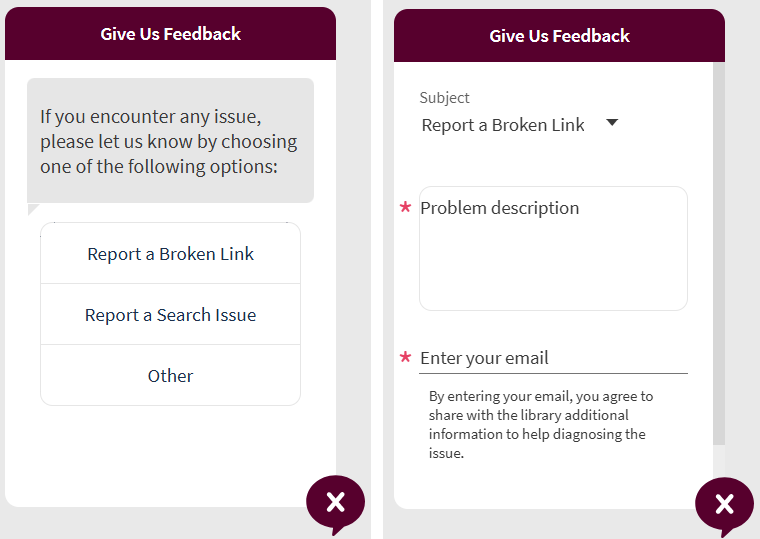
What to do if you encounter search issues?
If you encounter broken links, search issues or other problems in the virtual library, you can report them to the library staff by leaving feedback.
Click on the button in the lower right corner, select the problem area and describe the problem. If you want to leave a non-anonymous feedback or would like to receive an answer to your question, do not forget to enter your email address in the corresponding field. After filling in all the required fields, click "Send".
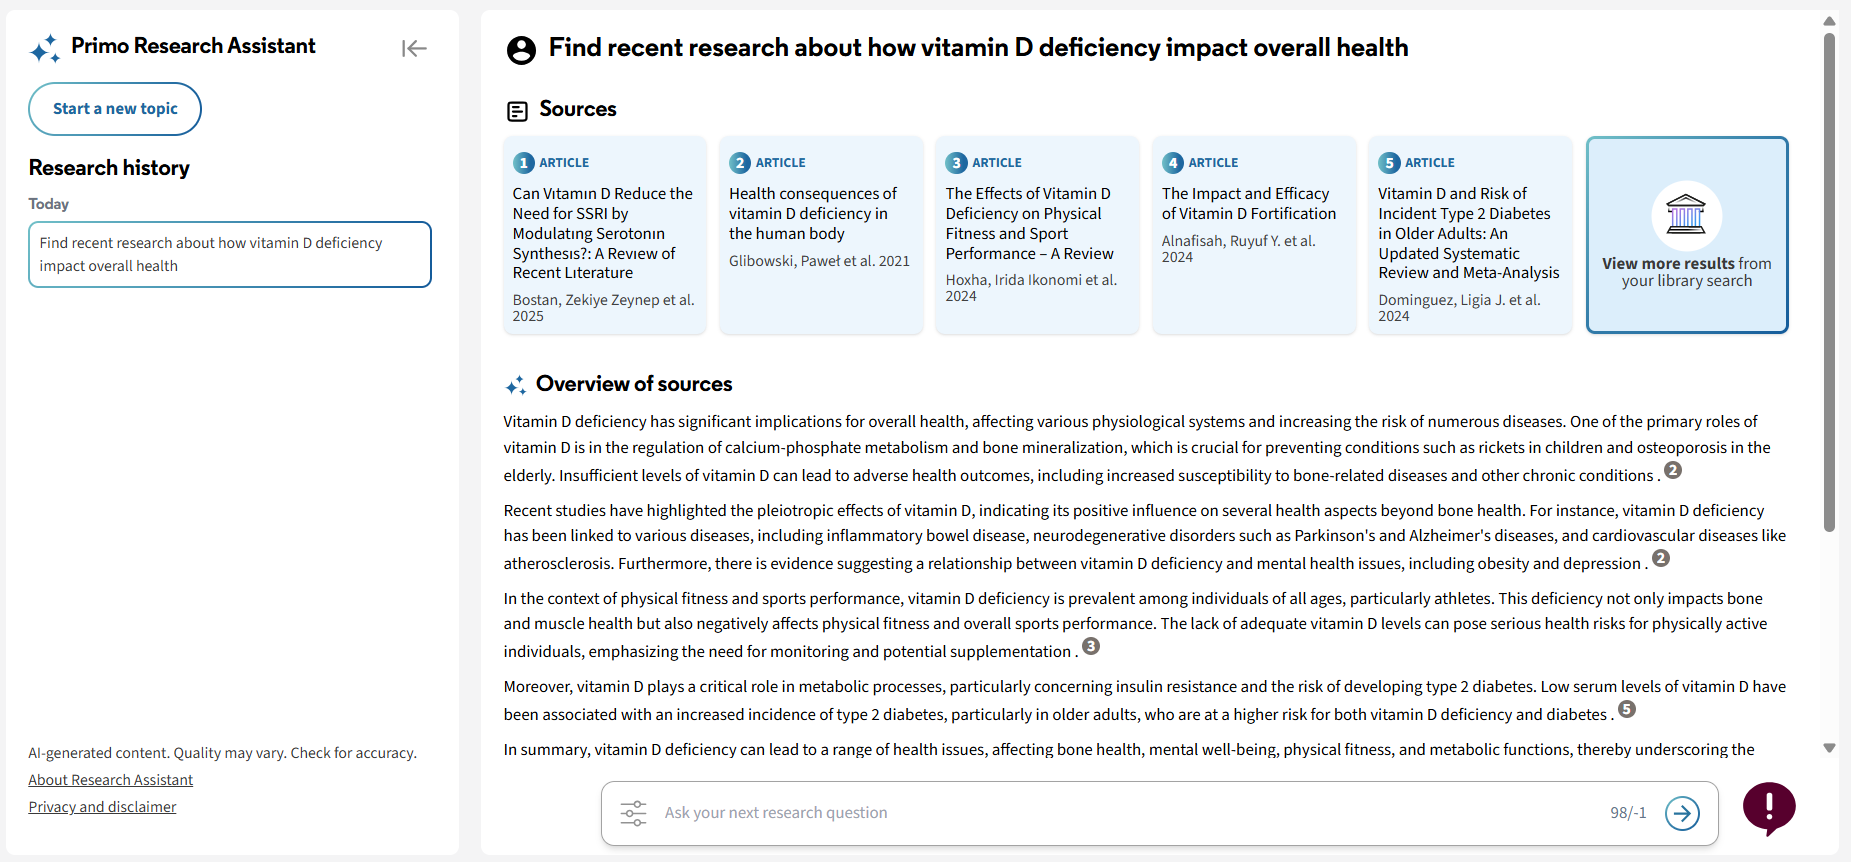
Research Assistant
The “Research Assistant” is the generative artificial intelligence (AI) tool based on the Big Language Model (GPT-4o mini).
Why try the “Research Assistant”?
- Searchable in natural language;
- Access to reliable e-resources from scientific information databases;
- Quick discovery of new research topics and suggestions for related questions to deepen your understanding of the topic.
To perform a search:
- Type your question in the search field and press Enter or the arrow button on the right (A). Questions can be asked in both English and Lithuanian.
- Important! The "Research Assistant" performs an expanded search, therefore it provides a list of both available and unavailable, but recommended information sources. To receive recommendations only for available information sources, select the "Available online" filter (C) before performing the search. You can also select relevant resource types and publication date in the filters (B).
- To clear the search field and applied filters, click on the trash can button on the right (D).
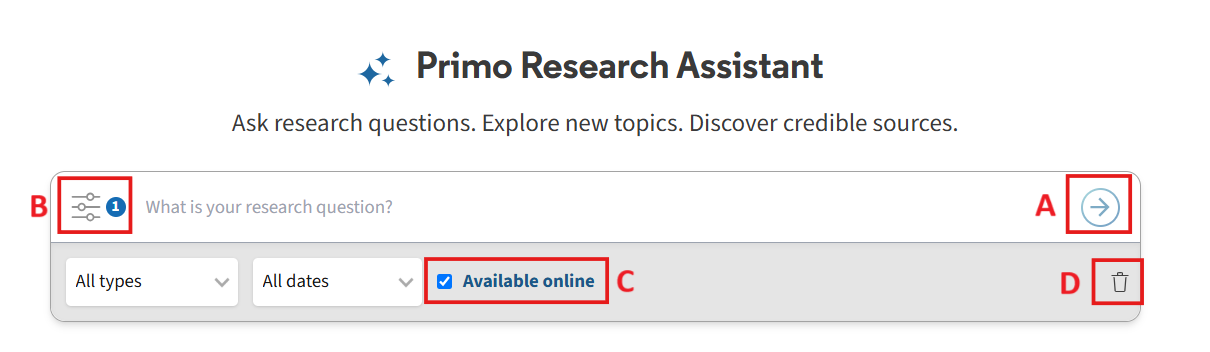 The "Research Assistant" will find academic text summaries that most closely match the search keywords and will present five sources of scientific information. It will also generate a concise answer to the research question along with links to the sources. By clicking on the selected information source, you will be able to read its summary, and by clicking the "More details and request options" button, you will be able to view a detailed description of the source in the Virtual Library.
- On the left side, you can see your search history and clear it.